Archive | March, 2013

Larger knitted chick to fit a Kinder Surprise egg.

26 Mar

SAM_2412

My knitted chick pattern to fit a Cadbury Creme egg has proved very popular

(https://eviesgran.wordpress.com/2013/01/05/knitted-chicks/)

and I decided to adapt it to take a larger Easter egg, the Kinder Surprise egg.

SAM_2409

SAM_2403

These are the instructions

With double knitting wool and Old UK size 10 needles (I’ve had these knitting needles for many years) I think the new UK sizing is 3.25

Cast on 46 stitches

Work 12 rows in garter stitch (all knit rows)

Row 13  Increase 1 stitch at each end of this row

Row 14  Knit

Row 15  Increase 1 stitch at each end of this row

Row 16  Knit

Row 17  Increase 1 stitch at each end of this row

Row 18 Knit

Row 19 Increase 1 stitch at end of this row. You should now have 54 stitches on the needle.

Rows 20, 21, 22  Knit

Row 23 Cast off 15 stitches at the beginning of the row. Knit to end of row

Row24 Cast off 15 stitches at the beginning of the row. Knit to end of row. You should now have 24 stitches on your needle.

Knit a further 13 rows in garter stitch (all knit).

Break off yarn at approx 18inches from knitting and thread the yarn through these last 24 stitches to draw up and make the round top of the chicks head. This long thread can be used to sew up the chick.

These are the making up instruction copied from the pattern for the small version of this chick

Making Up Instructions 

After making another 3 dozen chicks, I’m adding a few tips for making up the chick after knitting.

Its much easier to sew the eyes (I used one stitch of black wool for each eye) and to sew on the felt beak before sewing up the chick.

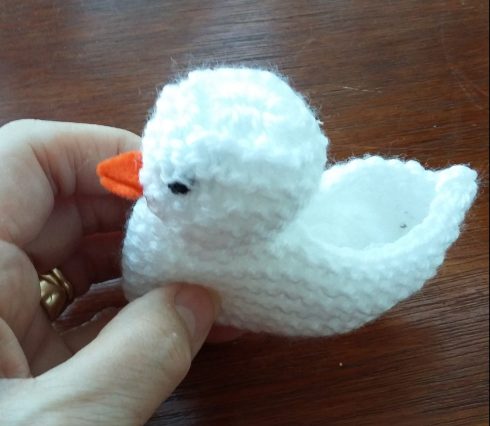
Also, I now invisibly sew a row of yarn, along the row between the head and body, to gather up later, to accentuate the head shape.

When the chick is sewn up, this thread is pulled gently and only slightly to accentuate the head.

SAM_2294

This photo above shows the position to place the gathering thread.

SAM_2297

After knitting the chick, instead of casting off the stitches, the yarn is threaded through them and drawn up tight to form the top of the head, as shown above.

I like to sew up the chick from the right side using the method below. I can’t remember whether it my Mum or one of my Grandmas who showed me this method but its my method of choice for most knitted garments.

SAM_2310

Sew from the wrong side to the right side of the item

SAM_2311

I also sew along the bottom of the chick (about one centimetre or so) so the egg is trapped and doesn’t easily fall out.

SAM_2313

Now add a creme egg of choice.

SAM_2315

The head has been stuffed with toy filling. You could use cotton wool too.

Take care of course if you give these to small children. Be aware the filling will be loose in the head cavity, the nature of the chick being, to be open at the bottom to add an egg of your choice.

SAM_2320

The finished chick …and a group of them.


SAM_2316

24th February 2017

Another version of this chick is to sew up the bottom and leave the space between head and tail open. This way a chocolate egg can be inserted from the top.

chick

My first thoughts on the ‘Cricut mini’

24 Mar

SAM_2395

I have seen these Cricut cutting machines on various craft channels on tv and I really wanted one and the name Cricut mini was on my wish list, so you can understand my joy when one arrived by courier.

I feel so lucky to be given the opportunityto actually get my hands on one free of charge with a view to writing a review for Cricut and now have been told I can keep it for ongoing future projects of which I will ‘tweet’ photographs.

After opening the box and checking off all the parts included, I found comprehensive, clear instructions of how to put in the cutting blade, connect to the power, access the internet and connect to the computer.

The sheet of A4 card is placed on the cutting mat which is slightly sticky and holds the card in place while the cuts are being made.

SAM_2341

All went smoothly until I realised the blade wasn’t touching the cutting mat and not making any cuts at all. I looked again at the instructions and replaced the blade in the correct position.

Its amazing that when I actually followed instructions correctly how things work so much better!

Then I was away…

I’m afraid I ploughed ahead and after choosing all the letters separately to make the words ‘happy birthday Pat’ I realised I could have typed the whole words at once which would have been so much easier. More haste less speed perhaps!

I love to personalise the cards I make with names and/or photographs and this is my first attempt at using the Cricut mini cutting machine

SAM_2397

I did a little embossing to finish off the card and I was really pleased with it.

SAM_2349

The machine operates reasonably quietly. Taking the cutting mat into the machine makes most noise. The actual cutting is a very quiet operation.

So as not to waste the cut out letters and to use both the negative and the positive image, I made another card using some card software and added the positive, ‘happy birthday’ greeting at the bottom.

SAM_2363My next project went slightly awry. The scrolls I had chosen were quite fine and the blade didn’t quite manage to cut it out cleanly, although when the cricut mini was connect to the internet, it cut out ‘thank you’ perfectly and this was extemely small.

SAM_2387

SAM_2372

I stuck the cut out waste scroll material on top of the cut as an embellishment and it looks great. I realised after cutting out all the letters for happy birthday individually for the first project, that you could actually type them out and add them as full words…please note my ‘deliberate’ mistake….. No ‘d’ in birthday… Perhaps the keyboard stuck but anyway, I didn’t notice it until the card was complete.

SAM_2380I searched high and low for the missing letter to stick the loose letters on yet another card and for ages couldn’t understand how I’d lost it and after making a ‘d’ in another colour eventually found out that the reason I couldn’t find it was because there hadn’t been one in the first place!

SAM_2375

Something you can do with the Cricut mini is to ‘weld’ two images together and I ‘welded’ a shoe and glass together and cut them out as one object, a perfect symbol for my friend’s cards.

Letters and shapes can be ‘welded’ together as in the ‘daisy chain’ letters on this next card.

SAM_2381

I’ ve added a ‘d’ to the card now. Do you think I can send it out like this?

SAM_2394

These are only a start. I’m loving it so far.

I shall blog  about other projects when I have completed more involved cuts.

There are so many designs to choose from and its such a clever machine. Its going to be exciting!

I was sent this Cricut mini free of charge so I could review it and all views stated here are true and my own.

SAM_2401

SAM_2402

Marmalade and sultana loaf cake

16 Mar

DSC_1925

DSC_1927

Somewhere in my memories, I have the memory of a cake my Mum made when I was young. My Dad loved a slice of similar cake with a big chunk of cold butter on top! I remember it well!

I feel sure it was a recipe where she rubbed the fat into the flour and then added the other ingredients rather than creaming the fat and sugar together so I set to, making up the recipe as I went along to try to recreate this cake of my childhood and this is what I have come up with.

Ingredients

8ozs S R flour

½teaspoon of baking powder

3 ozs of margarine, butter or baking liquid

3 ozs sugar

2 ozs sultanas

2 heaped desertspoons of Orange marmalade

1 large egg

1 fluid oz of milk (approximately)

Method

Pre heat the oven to 180° Electric, 4 Gas, 160° Fan oven

I sieved 8ozs of S R flour into a bowl with

½ teaspoon of baking powder and added

3 ozs of Stork baking liquid (or butter, or margarine)

If I’d have used solid fat, I would have rubbed it in as if making pastry but with the baking liquid being wet I used this contraption, which is really useful too if you have difficulty making pastry as your hands are too hot.

SAM_2327

I added 2ozs of sultanas

2 heaped desertspoons of marmalade (the tablespoon wouldn’t go in the jar)

I then separated an egg and beat up the white until it was in soft peaks, then added the yolk, mixed together and then added to the other ingredients.

I then added approximately 1 fluid oz of milk and mixed until the mixture was a soft dropping consistency.

Avoid overworking the mixture as this makes the gluten in the flour tough.

The mixture went into a 1lb loaf tin lined with baking parchment and baked in the middle of the oven for 35mins at 160° fan (180° electric, Gas mark 4) It may need longer. Test with a skewer which should come out cleanly with no mixture on the skewer when baked.

The loaf when baked was light and moist, not over sweet and a really great attempt to re create the taste of my Mum’s cake.
I grew up in Ripon and I remember my Grandma baking loaves of cake and sparsely adding dried fruit saying it had been thrown in from the top of the Cathedral (some had obviously missed as were so sparse). I felt a bit like this as I only added 2ozs of fruit. You could add more if you wished.

My loaf cracked on top. Perhaps I’ll lower my oven temperature next time I bake this. It was great to eat but I believe when cakes crack like this the top has baked before the cake middle which then has to push through the crust.

DSC_1924

DSC_1927

It was delicious. Enjoy!

Clandestine Cake Club at The Gallery Bistro & Revive Spa, Heckmondwike

9 Mar

We had a superb evening on Thursday 19th February.

IMG_3645

The members of the Spen Valley group of the Clandestine Cake Club took along their cakes to the Gallery Bistro in Heckmondwike and were welcomed by owner Hilary and her team.

The theme of the evening was ‘Finishing Touches’ to echo the nature of the hair and beauty treatments available.

There were 22 people, 14 bakers and their guests and the cakes included, vanilla and chocolate cake,  light stem ginger cake, chocolate beetroot cake, coffee and walnut cake, chocolate frosted cake,  salted caramel cake,  Guinness and chocolate cake, Victoria sponge cake, coffee and chocolate cake, toffee apple cake, caramel cake, lemon curd cake and blackberry and mint and yet another chocolate cake. Beautiful to look at and delicious every one.

I was so busy chatting during the evening it was only when I looked at the photos later that I realised I had no pictures of cake eating!

Lots of cake pictures though.

Thanks to Kay @kayzeewells and Steph @missstephwalker for sending photos for me to add to this blog.

Gallery cakes 1 - Copy

IMG_3643

IMAG0234_edited

IMAG0231_edited

IMAG0230_edited

IMAG0229_edited

IMAG0228_edited

IMAG0227_edited

IMAG0226_edited

?????????????????

IMAG0214

IMAG0224_edited

IMAG0223_edited

IMAG0222_edited

The Gallery is attached to the Revive Spa and during the evening many of the members enjoyed complementary facials and manicures and many had their eyebrows threaded.


Phone pictures 886

Phone pictures 887

Phone pictures 888The two hours passed in a flash and I missed the chance to try any of the treatments but all of us said what a great evening it had been

I managed to take this plate of cake home too!

Phone pictures 889

Cakes!

3 Mar

Hello Kitty cake, Evie 4

Seeing the great ‘Hello Kitty’ cake my Daughter Helen (@BakingAitch) has made for Evie’s fourth birthday tomorrow the 4th March reminded me of cakes I made for Helen and my Son Richard for their childhood birthdays.

At first I chose the theme and as they got older I usually asked the question “What cake do you want for your birthday this year?”

As Richard’s birthday is 20th October and Helen’s is 21st October, I always had to make two cakes at once. The cakes were obviously not of professional standard but at the time everyone loved them and I enjoyed making them.

These are some of the cakes I made.

Age 3                          Teapot and hedgehog cake for a 3rd birthday

img063                                   Yet another teapot and a car

img071                                                     Doll and dice cakes

img064                                                         Hat and Batman cakes

img065           Tea party cake, complete with mini cake, cups and sandwiches

and cricket field cake.

I also found this photo of a cake I made for a friend’s baby’s Christening. All the trellis work and blue roses were made by me. I was very proud of this one!

img072

…and this was the cake I made for my Mother in laws 80th birthday in 1988

img075

Many years ago…..

H & R 1988